Deploying to Multiple Environments With GitHub Actions
Original articel about deploymen.
Deploying to Multiple Environments with GitHub Actions
Recently I used GitHub Actions to facilitate automated deployments for a new app. I was impressed overall with GitHub’s new CI offering. It was fairly simple to configure, and so far it hasn’t cost anything, even with a private repo. I also use a cool little Slack integration to notify the team of new deployments.
Initially I configured the GitHub Action in a simple way. When the team pushed to master, it deployed to our dev environment. However, after the app went live, we needed a way to push to both the dev and production environments, using separate branches. To my surprise, there were no clear tutorials on the web for how to set this up. I eventually figured it out by combining information from multiple blog posts and a YouTube video.
In this post, I’ll walk you through configuring GitHub Actions to deploy to multiple self-hosted environments. This way you can push to a dev or QA environment for testing and verification of changes, and then to a production environment once everything is working well.
Installing the runner
First you will want to create a “runner.” A runner is essentially a service that listens for push events in your repo. GitHub offers two types of runners: Github-hosted runners (which run on Github’s servers), and self-hosted runners. Since we used AWS to host our app, we used self-hosted runners.
You can create a self-hosted runner in GitHub by going to your repo > Settings > Actions > Runners. Click on the New Self-hosted Runner button and it will walk you through the process of downloading and configuring the runner on your target environment.
Note: If you’d like to share a runner with multiple repos, create the runner on the Organization level instead.
Configuring the runner as a service
The instructions that GitHub provides show you how to run the service directly in the terminal.
You most likely won’t want to do this, however, since once you exit the terminal, the runner will stop. Instead, you’ll want to configure it as a background service, using these instructions. Note that all the commands in the instructions should be run within the actions-runner folder that you created when downloading the runner.
Repeat as needed for each target environment
Repeat the steps above for each environment/server you’d like to deploy to (dev, prod, etc.).
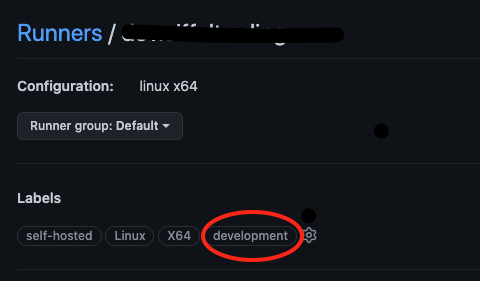
Adding tags to the runners
Once the runners are created for all environments, go to your repo > Settings > Actions > Runners. Click on each runner, and add a label with your environment name (i.e., development, production, etc.). This label will be used to match a push event to a specific environment.
Create the yaml file
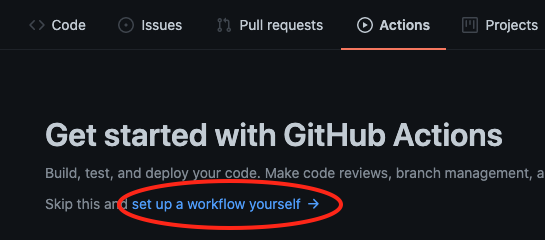
Next, you’ll create a yaml file with instructions on when and how to deploy. Go to your repo page and click on the Actions tab at the top, then click on “Set up a workflow yourself.”
You’ll then be dropped into the GitHub editor where you can create your yaml file. Here is the file I used to deploy to separate dev and production environments. Our app was built using Nuxt, so the run commands use Node and pm2. You’ll want to change this of course, based on your specific build steps and requirements.
 1name: Deploy to server
 2
 3on:
 4  push:
 5    branches: [ "dev", "master" ]
 6  pull_request:
 7    branches: [ "master" ]
 8
 9jobs:
10  dev_deploy:
11    # The type of runner that the job will run on
12    runs-on: [self-hosted, development]
13    # look at the ref and only run this job if the branch that triggered the workflow is "dev"
14    if: endswith(github.ref, 'dev')
15    # Steps represent a sequence of tasks that will be executed as part of the job
16    strategy:
17      matrix:
18        node-version: [14.x]
19
20    steps:
21    - uses: actions/checkout@v3
22    - name: Use Node.js ${{ matrix.node-version }}
23      uses: actions/setup-node@v3
24      with:
25        node-version: ${{ matrix.node-version }}
26        cache: 'npm'
27    - run: npm ci
28    - run: cp ~/skimpel-api/production.env ~/skimpel-api/_work/skimpel-api/skimpel-api
29    - run: npm run build:prod
30    - run: pm2 restart skimpel-api
31
32  prod_deploy:
33    runs-on: [self-hosted, production]
34    # look at the ref and only run this job if the branch that triggered the workflow is "dev"
35    if: endswith(github.ref, 'master')
36    # Steps represent a sequence of tasks that will be executed as part of the job
37    strategy:
38      matrix:
39        node-version: [14.x]
40
41    steps:
42    - uses: actions/checkout@v3
43    - name: Use Node.js ${{ matrix.node-version }}
44      uses: actions/setup-node@v3
45      with:
46        node-version: ${{ matrix.node-version }}
47        cache: 'npm'
48    - run: npm ci
49    - run: cp ~/skimpel-api/production.env ~/skimpel-api/_work/skimpel-api/skimpel-api
50    - run: npm run build:prod
51    - run: pm2 restart skimpel-api
A few important things to note about the above yaml:
- The “on” section is watching for push events to two branches: dev and master
- There are two deploy jobs (dev_deploy and prod_deploy).
- The “runs-on” section use the runner label created above to target the correct runner and environment.
- The “if” section uses the endswith function to apply conditional logic for the job based on the branch name from github.ref.
- The final job, notify, used the Slack integration mentioned above, and is totally optional. Notice the needs section, which ensures that the notification is sent for a production deployment only.
In a nutshell, the runs-on section targets the environment based on the runner label, and the if section ensures that only pushes to a specific branch get deployed to that environment. For example, a push to the dev branch will get deployed to the dev environment, via the runner with the “development” label.
Finishing up
Once the yaml file is ready, go ahead and commit it to master, and the GitHub Actions deployments will automatically start. You can view the deployments, including details on each run, in the Actions tab.
Also, the specific folder that GitHub uses for deployments on the target server is actions-runner/_work. Use that folder for hosting your app, or to troubleshoot issues in the code.
Let me know if you have any questions or problems using the comments below.